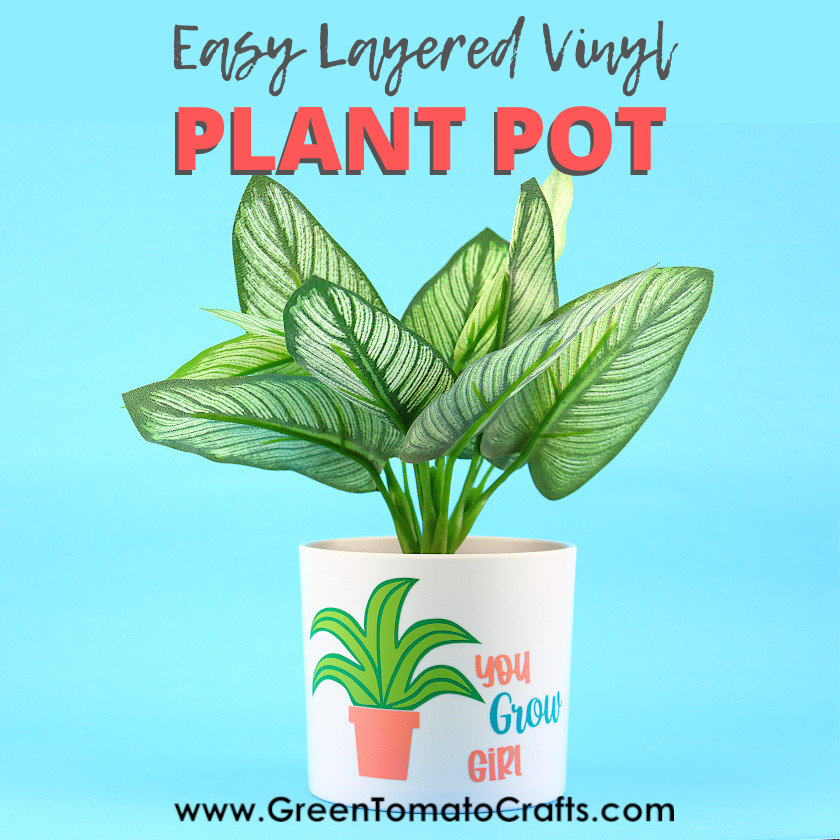
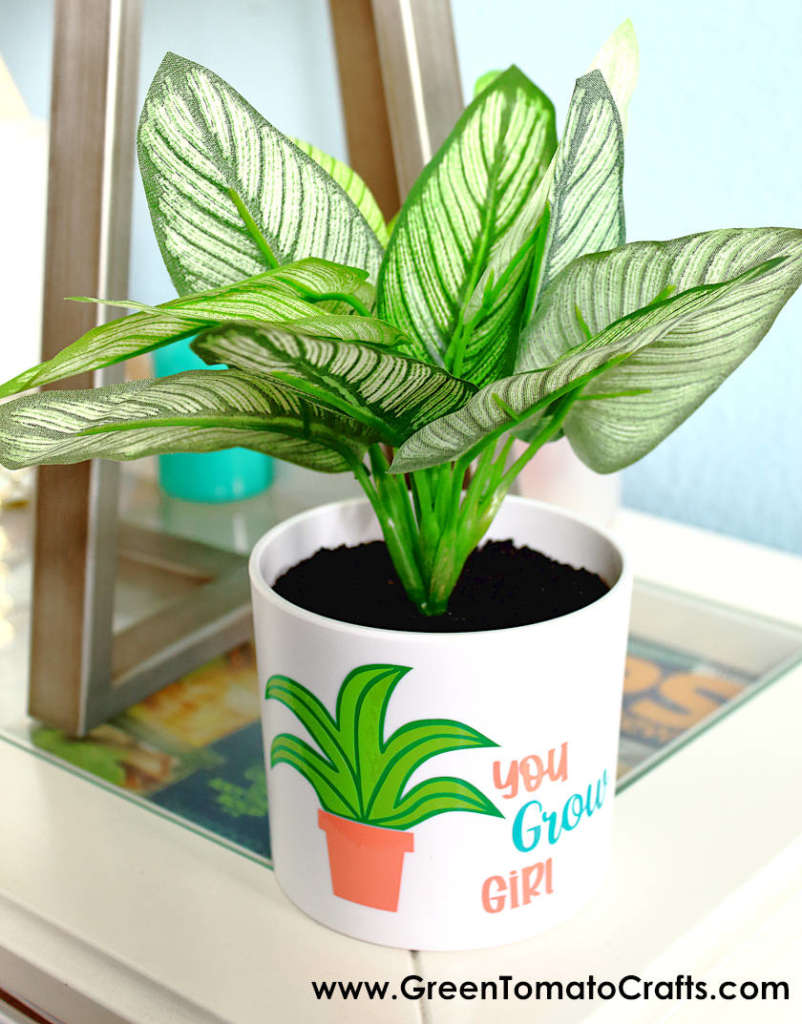
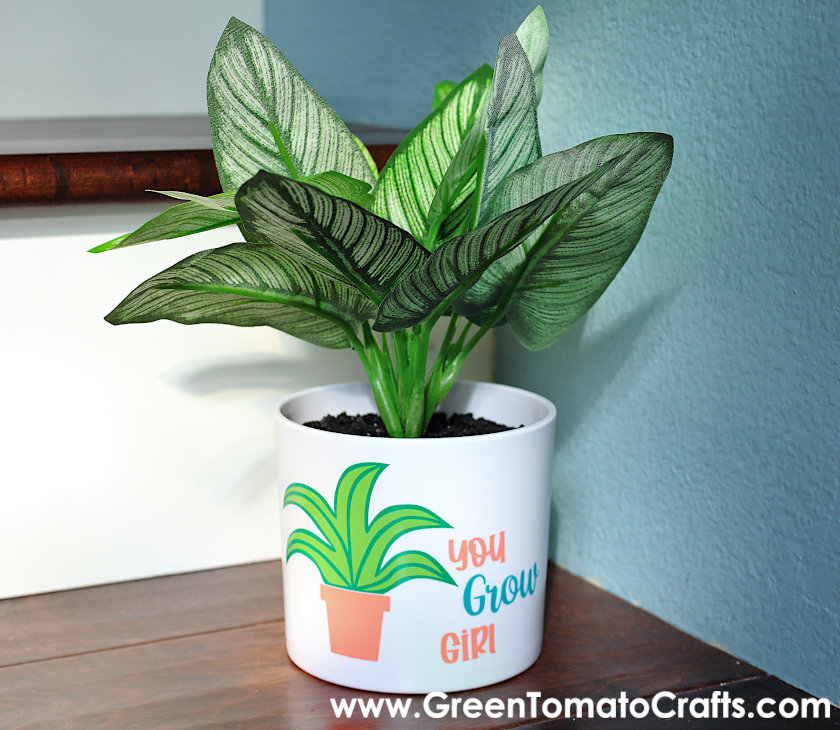
This adorable “You Grow Girl” SVG design will both uplift and inspire. Make your own DIY layered vinyl plant pot as seen here or use it on a shirt, sign, watering can, or even a pair of cute garden gloves. Give as a gift or keep for yourself to brighten your day!

Are you looking for a cute and simple handmade gift for a friend? Need something inspirational and uplifting to brighten their day? Or perhaps you could use your own pick-me-up. This cute layered vinyl plant pot with my “You Grow Girl” SVG decal is simple to put together and makes such a sweet gift. I used permanent adhesive vinyl on a basic white small planter to make the design pop, but you could choose any pot or planter you like. You can even use this SVG with other materials. I’ve included some fun ideas below.
When choosing a planter for your layered vinyl plant pot, I recommend picking one that is fairly smooth and straight on the sides. It can be round, square or triangular. Just be mindful of where you want the design to be. I chose a white planter, but feel free to choose coordinating colors to suit your preference or your mood. I recommend picking a plastic, painted, or ceramic glazed planter instead of a plain terracotta one, as I’m not sure how water seeping through the porous terracotta pot will affect the vinyl adhesive over time. I am testing it, however, and will update this post with what I discover. If you try it, please let me know how it works out for you!
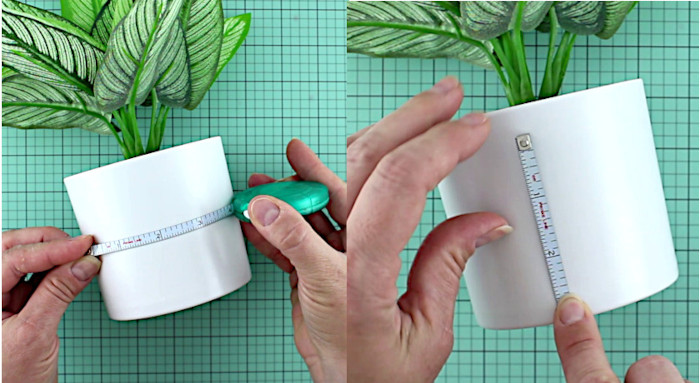
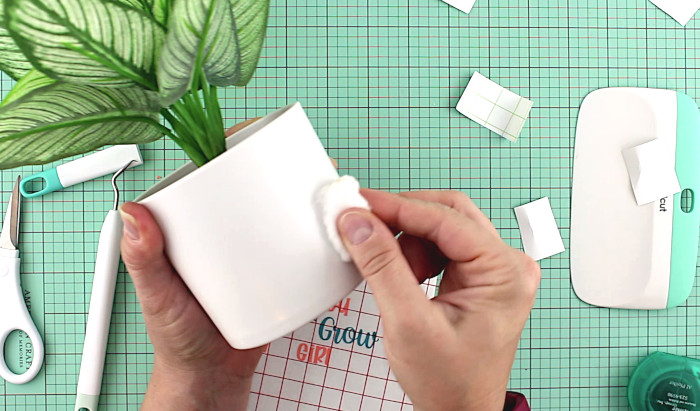
I also strongly suggest you wipe your surface with rubbing alcohol to remove any dust, dirt or oils prior to applying the design. I simply pour a small amount on a cotton ball, wipe it down and let dry. And, please make sure to measure the space where your decal will go. When sizing it in Design Space or other software, you want to make it large enough to be seen, but not so big that you have to turn the planter to see the whole thing. It’s no fun wasting vinyl and having to redo a project – measuring is key!
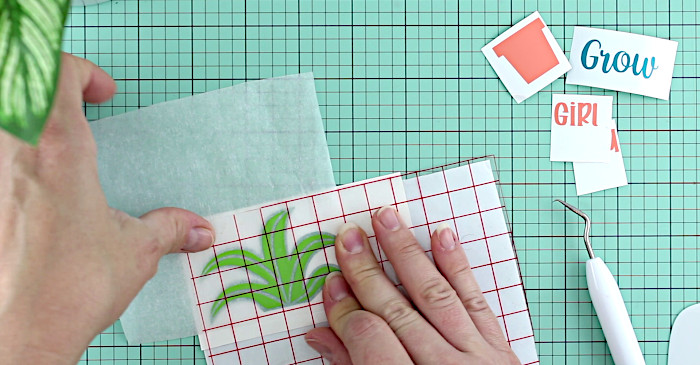
When layering vinyl, I like to use the parchment paper method. It involves placing a small piece of parchment paper between the top layer of vinyl already on your transfer sheet and the next layer of vinyl. Since vinyl and transfer tape do not stick to parchment, you can position your layers exactly where you want them before adhering them together. Just leave an edge of the backing from the bottom piece of vinyl peeking out from the parchment paper so that you can press it down and hold it in place while you remove the parchment. For this layered vinyl plant pot, you only need to layer the two plant pieces, but I find the method helpful for places the other elements as well.
NOTE: Please, do not substitute wax paper for parchment. The wax can come free from the paper and stick to your vinyl, resulting in a less-than-sticky situation when you go to apply your design. We definitely don’t want that!
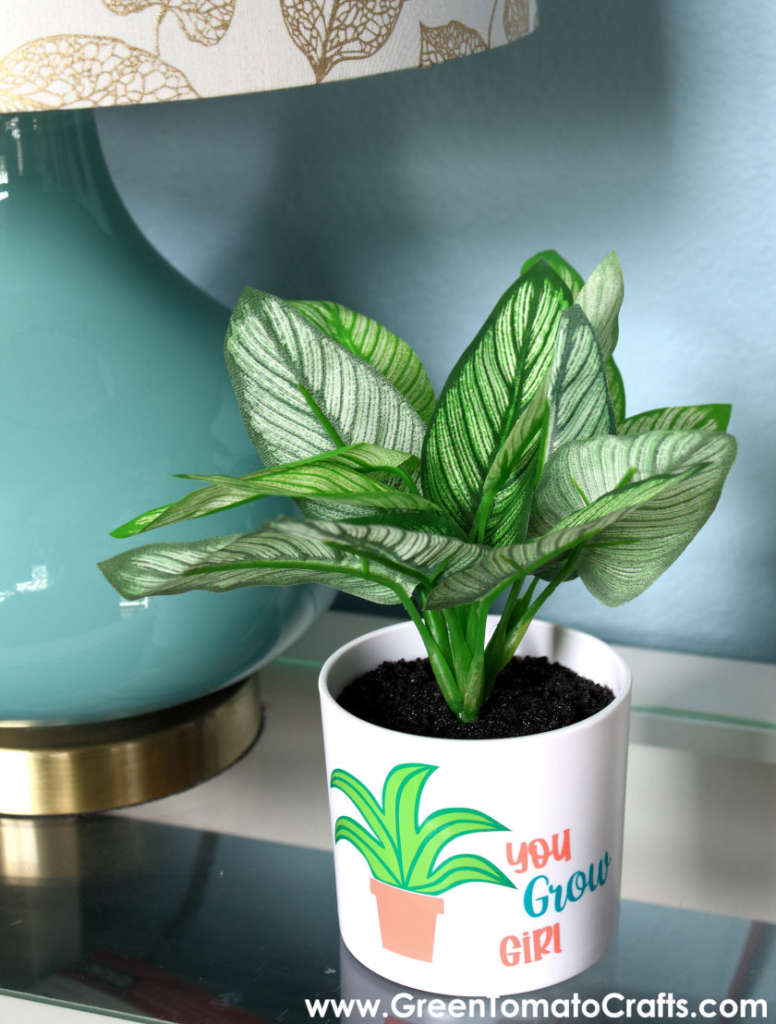
Don’t have a green thumb but love the idea? Find a realistic looking faux plant like I did here! No watering required.
WHAT YOU NEED:
- Planter (preferably plastic, painted or glazed)
- Adhesive Vinyl (I recommend permanent vinyl)
- Cricut cutting machine (or other cutting machine)
- Weeding tool
- Scraper tool
- Rubbing alcohol
- Cotton ball (or paper towel)
- Transfer tape
- Light grip mat
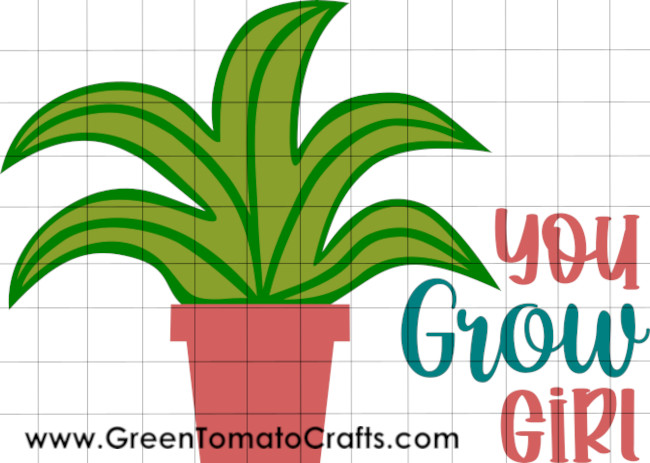
- Design #2 Grow Girl Decal (available in my Free Resource Library – get the password by completing the form at the bottom of the page)
HOW TO MAKE IT:
- Measure your surface
Check the dimensions of your planter. You want to be able to see the entire design when looking at the front of your planter, so be mindful of that when deciding on the dimensions for the design.
- Get the file
You can find and download my “You Grow Girl” decal file in my Resource Library.
- Prepare the file for cutting
Upload the file to Cricut Design Space (or other design software). Size the design to fit the dimensions you measured in step 1. The file has a color assigned to each element, however you may choose any colors you wish. Any elements you wish to cut in the same color should be assigned the same color in design space, so that they end up on the same mat.*

- Cut
Using the light grip mat, place your adhesive vinyl face up on the mat. Choose premium vinyl for your material and cut with the fine point blade.
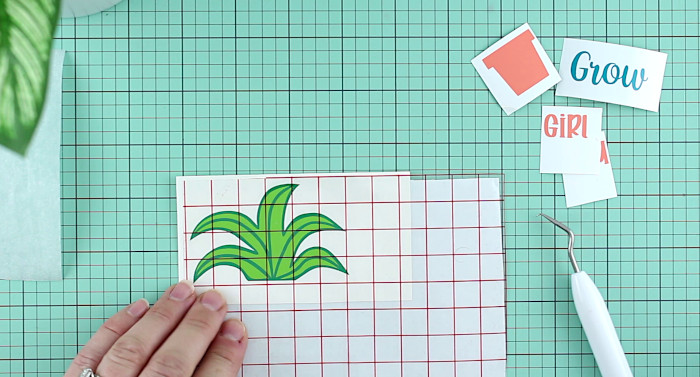
- Weed the design
Using your weeding tool, remove the excess vinyl around the cut design. Be patient – sometimes it can be tricky to get a hold of the vinyl with the tool.

- Transfer the design
Wipe your surface with rubbing alcohol and allow to dry. Cut a piece of transfer tape slightly larger than the design. I used a single piece of transfer tape for the entire design but you may also cut a piece the same size as the pot and plant together and use a separate piece of transfer tape for the words.
Starting with the plant inside leaf design (the smaller leaf sections in lighter green in my original design), remove the backing from the transfer tape and apply to the design. Use your scraping tool to smooth the transfer tape onto the design. Make sure to use pressure so that your design sticks to the tape. Once the design is on the transfer tape, remove the backing from the vinyl.

Next, you will position this over the leaf outline design (the large single plant sections in darker green in my original design), being careful to line them up so that they are relatively evenly spaced. This is more easily done by placing a small piece of parchment paper between the two designs since the vinyl and transfer tape do not stick to parchment. While aligning the two pieces together, allow the inner edge of the backing from the bottom piece of vinyl to peek out from the edge of the parchment. Reposition with the parchment between the two pieces. Once you have it in position, press down where the transfer tape meets the backing of the bottom layer. Carefully remove the parchment paper and press into place.
Smooth with your scraping tool and remove the backing from that part of the design. Repeat with the remaining pieces.

Position the assembled design on your chosen planter and carefully press it down from the center outwards. Use your scraping tool to adhere the vinyl to the planter and gently remove the transfer tape. If any vinyl still sticks to the transfer tape, press down again and scrape again, making sure to use plenty of pressure. Repeat with the remainder of the design.


All done! Now, wasn’t that easy?
*NOTE: I test all my files by uploading the SVG’s to Cricut Design space and cutting them with a Cricut Maker machine. This is done on a PC. Sometimes, things upload differently into Design Space on different devices, so always be sure to double check the sizing, and resize accordingly. I also upload the included DXF file to Silhouette Studio to check the sizing and layers, however, I do not test cutting with a Silhouette machine.
SOME OTHER FUN IDEAS FOR THE “You Grow Girl” SVG:
With adhesive vinyl:
- Wood sign
- Watering can
- Picture or canvas
With HTV:
- Shirt
- Canvas bag
- Gardening gloves
Other ideas:
- Window cling decal
- Shadow box
- Charm made from shrinky dinks

Layered Vinyl Plant Pot
This adorable “You Grow Girl” SVG design will both uplift and inspire. Make your own DIY planter as seen here or use it on a shirt, sign, watering can, or even a pair of cute garden gloves. Give as a gift or keep for yourself to brighten your day!
Materials
- Planter (preferably plastic, painted or glazed)
- Adhesive Vinyl in your chosen colors(I recommend permanent vinyl)
- Transfer tape
- Rubbing alcohol
- cotton ball (or paper towel)
- Design #2 Grow Girl Decal (available in my Free Resource Library – get the password by completing the form at the bottom of the page)
Tools
- Cricut cutting machine (or other cutting machine)
- Weeding tool
- Scraper tool
- Light grip mat
Instructions
- Measure your surface. Check the dimensions of your planter. You want to be able to see the entire design when looking at the front of your planter, so be mindful of that when deciding on the dimensions for the design.
- Get the file. You can find and download my “You Grow Girl” decal file in my Resource Library.
- Prepare the file for cutting. Upload the file to Cricut Design Space (or other design software). Size the design to fit the dimensions you measured in step 1. The file has a color assigned to each element, however you may choose any colors you wish. Any elements you wish to cut in the same color should be assigned the same color in design space, so that they end up on the same mat.*
- Cut. Using the light grip mat, place your adhesive vinyl face up on the mat and cut with the fine point blade.
- Weed the design. Using your weeding tool, remove the excess vinyl around the cut design. Be patient - sometimes it can be tricky to get a hold of the vinyl with the tool.
- Transfer the design. Wipe your surface with rubbing alcohol and allow to dry. Cut a piece of transfer tape slightly larger than the design. I used a single piece of transfer tape for the entire design but you may also cut a piece the same size as the pot and plant together and use a separate piece of transfer tape for the words.
Starting with the plant inside leaf design (the smaller leaf sections in lighter green in my original design), remove the backing from the transfer tape and apply to the design. Use your scraping tool to smooth the transfer tape onto the design. Make sure to use pressure so that your design sticks to the tape. Once the design is on the transfer tape, remove the backing from the vinyl.
Next, you will position this over the leafoutline design (the large single plant sections in darker green in my original design), being careful to line them up so that they are relatively evenly spaced. This is more easily done by placing a small piece of parchment paper between the two designs since the vinyl and transfer tape do not stick to parchment. While aligning the two pieces together, allow the inner edge of the backing from the bottom piece of vinyl to peek out from the edge of the parchment. Reposition with the parchment between the two pieces. Once you have it in position, press down where the transfer tape meets the backing of the bottom layer. Carefully remove the parchment paper and press into place.
Smooth with your scraping tool and remove the backing from that part of the design. Repeat with the remaining pieces.
Position the assembled design on your chosen planter and carefully press it down from the center outwards. Use your scraping tool to adhere the vinyl to the planter and gently remove the transfer tape. If any vinyl still sticks to the transfer tape, press down again and scrape again, making sure to use plenty of pressure. Repeat with the remainder of the design.
Notes
I test all my files by uploading the SVG’s to Cricut Design space and cutting them with a Cricut Maker machine. This is done on a PC. Sometimes, things upload differently into Design Space on different devices, so always be sure to double check the sizing, and resize accordingly. I also upload the included DXF file to Silhouette Studio to check the sizing and layers, however, I do not test cutting
with a Silhouette machine.
WANT TO SAVE THIS FOR LATER? CLICK HERE TO SAVE TO PINTEREST!

I’d love to see what you make with this design! Drop me a line at hello@greentomatocrafts.com or tag me on social media with #greentomatocrafts.
Have anything you’d love to make or learn? Contact Me! I’d love to hear from you!

Leave a Reply